This guide provides in-depth walkthroughs on how to achieve specific functionality within Task Builder 2. Previously, these setups would have been difficult to achieve in Task Builder 1, and many required scripting, but Task Builder 2 has made them much easier to implement in your experimental protocol. To achieve the functions described, many of the tasks use Advanced Binding settings.
You can find all of the tasks referenced in this guide in our From Simple Components to Advanced Functionality Project. Each page will have a link to the specific task which showcases the features.
There are a few different ways in which you may need to implement a back button in your task, depending on your task setup and what you are looking to achieve. You can find each of the three methods described below in the Adding a Back Button Task. Each of the methods described refer to a different display and spreadsheet within this task. To preview each method, select the appropriate spreadsheet in the dropdown after clicking 'Preview' on the task.
This setup refers to the BackButton1 display and spreadsheet in the task linked above.
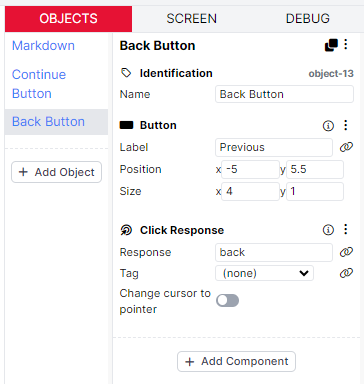
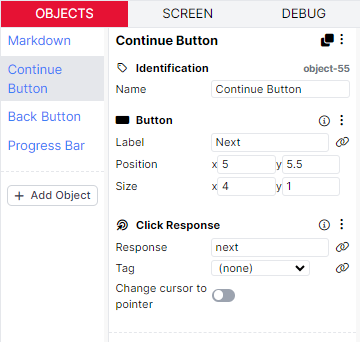
You can add a back button to go back to a previous screen in the same display by using the Branch component. To set this up, we have a standard Continue Button prefab to allow participants to continue to the next screen. A second Button has been added to the screen with a Click Response component. The Click Response component has been set up to record the response ‘back’ when clicked.
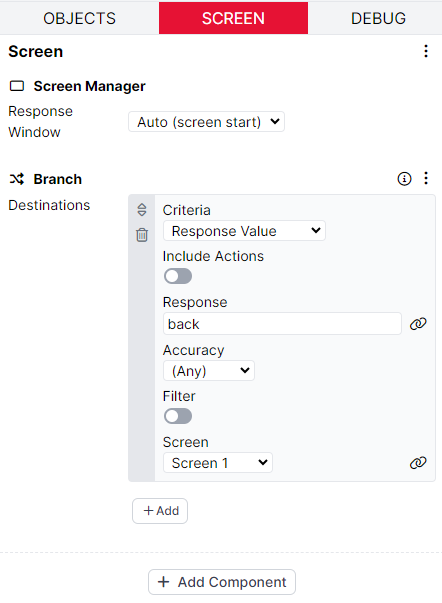
This response is then used in the Branch component, so that when this response is received, participants are branched to the previous screen in the display.
This setup refers to the BackButton2 display and spreadsheet in the task linked above.
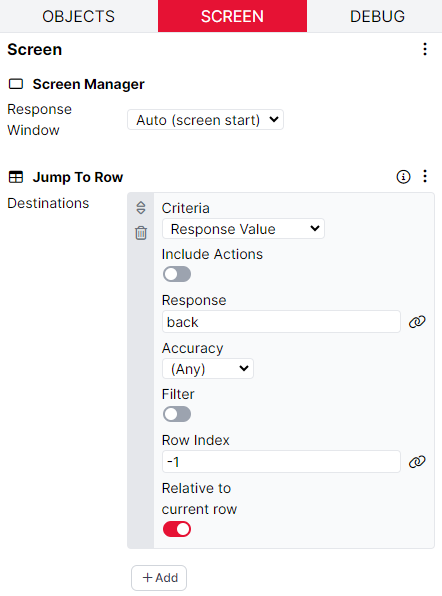
You can add a back button to return to a previous trial in a similar way to the method described above. In this example, you will also need an additional Button with the Click Response recorded as ‘back’, as shown above. However, in this setup, rather than using the Branch component, we use the Jump to Row component instead. Here, we set up the Jump to Row component so that when the response ‘back’ is received, we jump back a row in the spreadsheet. We do this by setting the row index as -1 and using the Relative to current row toggle. This logic means that when the back button is clicked, the participant is jumped back to the previous row in the spreadsheet.
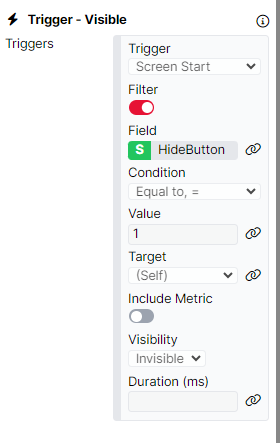
We also do not want the back button to appear on the first trial in the task, as there is no previous trial to return to. We achieve this with a Trigger - Visible component on the back button object. On screen start, we use the Filter toggle to evaluate the 'HideButton' column of the spreadsheet. If the value is equal to 1 in this column, we want the button to be invisible. In the spreadsheet, we have entered a 1 in this column for the first trial so that the back button does not appear.
This setup refers to the BackButton3 display and spreadsheet in the task linked above.
If we want a back button and a progress bar that adapts to the participant moving backwards and forwards through a task, then we need a slightly different setup to those described above.
On the Continue Button, instead of adding the Click to Continue component, we have added a Click Response component with the response ‘next’. This is because we use the response provided by the Continue button to control the Progress Bar increasing.
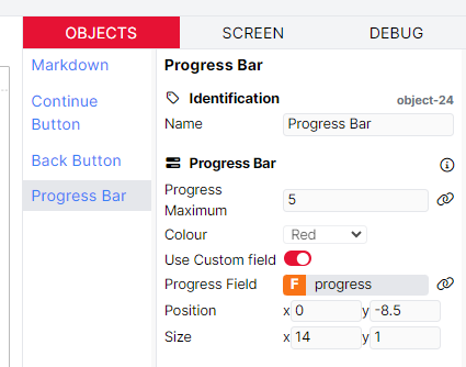
For this Progress Bar component, we use the custom field called ‘progress’. We use the Custom Field in this setup, so that we can increase and decrease the progress bar based on the responses received from the participant. This way, we can make sure the progress bar increases when we move forwards in the task, and decreases when we move backwards.
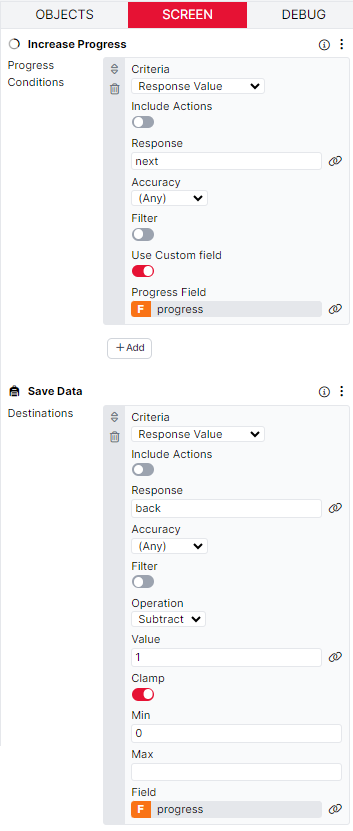
In the Increase Progress component, we increase the progress each time the response ‘next’ is received. Again, we need to make sure that the Custom field is used and we bind this to the ‘progress’ field. Then, to make sure that the Progress component adapts when the back button is pressed, the Save Data component handles this. When the response ‘back’ is received, we subtract 1 from the progress field. Importantly, we clamp the minimum so that the value cannot go below 0.
We have created a simple Delayed Feedback Task to demonstrate the functionality described below.
In this task setup, participants type their response into a Text Entry component. The response accuracy is evaluated by the Scorer component. We want to give participants feedback on this response, but not on the same screen. Therefore, the Feedback component will not work here, as this component is designed to give immediate feedback. Instead, we use the Save Data component to store the response accuracy until it is needed.
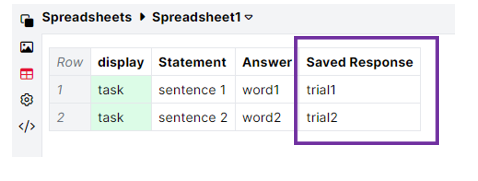
First, we need to add an additional column to the spreadsheet. In this task, we have added a column called ‘Saved Response’. In this column, each trial has a unique entry: ‘trial1’ and ‘trial2’. These will become the names of fields in the Store that each trial’s response accuracy will be saved to.
To do this, we set up two criteria in our Save Data component. The first is for when the Response Accuracy is correct. When a correct response is received, we want to set the Store field for this trial to ‘correct’. As we have multiple trials, we need to use the advanced binding settings in the Field to make sure each trial’s response is stored separately in the correct field.
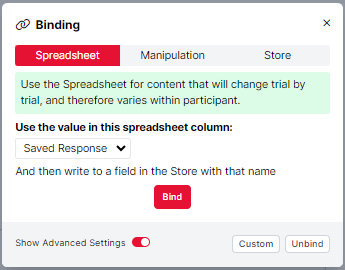
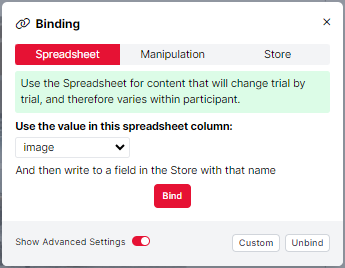
To achieve this, we use the Advanced Settings toggle to tell Gorilla to look at the spreadsheet column ‘Saved Response’ and then use the value here to write to a field in the Store with that name. When you open the binding modal, it should look like the image below, with the Advanced Settings toggled on:
Then, once the binding has been configured, the component configuration settings should look like the example below:
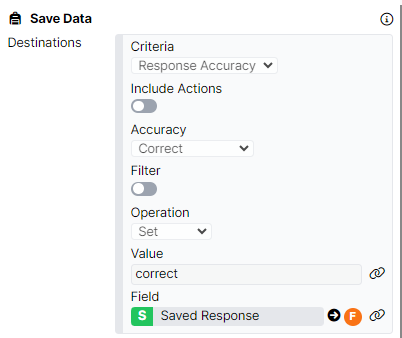
We apply this same logic for when the Response Accuracy is incorrect. Instead of setting the value to 'correct', we set it to 'incorrect'.
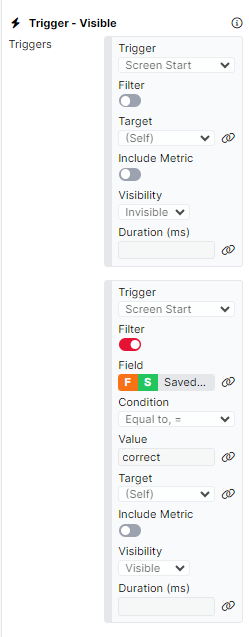
Then, on the second screen of the display, we want to give participants feedback on the response they have just given. In this example, we have two Image components, each one giving correct or incorrect feedback. To control which image should be shown to the participant, we use the Trigger - Visible component on each image object. Both objects have two triggers. The first sets the image to be invisible on screen start. Then, we need to evaluate the value in the Store for this trial to decide whether correct or incorrect feedback should be given.
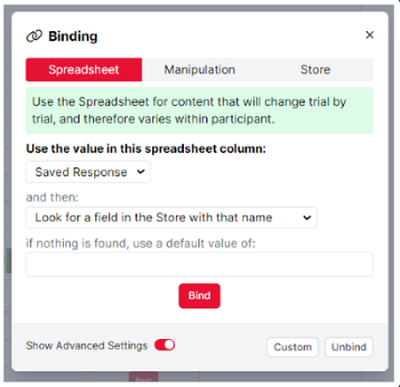
The screenshots below show how to set this second trigger up on the correct feedback object. On screen start, we use the Filter toggle to evaluate the value in the Store for this trial. Again, we will need to use the advanced settings to ask Gorilla to look at the spreadsheet column Saved Response, and then look for a field in the Store with that name, as demonstrated in the image below:
If the value in this field is equal to 'correct', then we want the correct feedback to be Visible. If the value does not meet this condition, it will remain invisible.
Then, we apply these same triggers to the incorrect feedback object. This time, rather than the value being equal to 'correct', we evaluate whether it is equal to 'incorrect'.
You can control when a task should end based on a variety of different criteria. Below, you can find descriptions of some of the setups we frequently see researchers wanting to implement and how they can be achieved.
To see the setup explained below in action, take a look at our Exit Condition - 3 Incorrect Trials Task.
In this task, we have a simple display with two screens. On Screen 2, participants are presented a number and respond by stating that the number is either odd or even. The accuracy of participants’ responses are recorded using the Scorer component. On this screen, we also need to use the Save Accuracy component to save the number of incorrect responses given to a field in the Store called ‘incorrectResponses’.
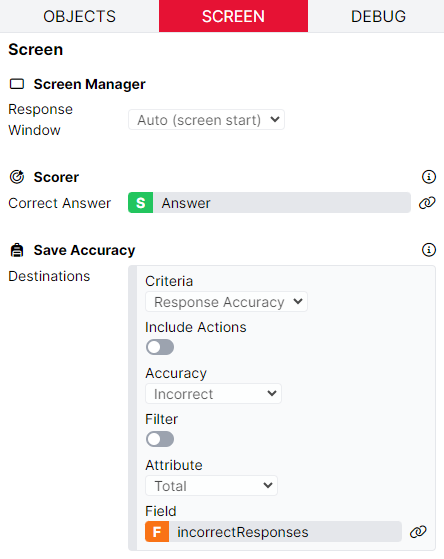
In this example, we want the task to end as soon as participants have given 3 incorrect responses. We set this up on Screen 1 of the display, which is a blank screen with a very short time limit. On this screen, we also use the Task Early Exit component to evalutate how many incorrect responses have been given, and whether the task should end. To do this, we set the criteria to Any Response (this includes the 'timed out' response that will be triggered by the Time Limit component). We add a Filter and check whether the Value in the incorrectResponses field is equal to 3. If this criteria is met, the task will end and the Exit Value defined will be saved to the Exit Field. In this case, the Value 'Exit' will be saved to the TaskExit field in the Store.
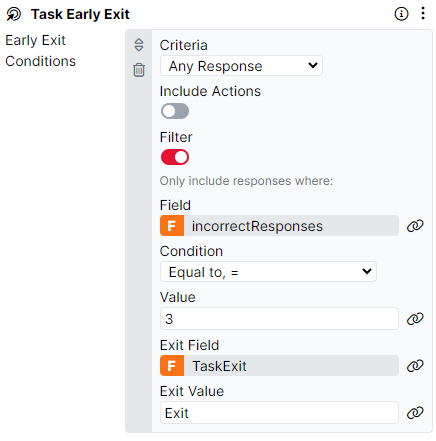
We could then use this Exit Field and Value in a Branch Node to direct participants to a Reject Node and end the entire experiment. If the Early Exit criteria is not met, participants will continue with the task.
To see the setup explained below in action, take a look at our Exit Condition - Consecutive Incorrect Task.
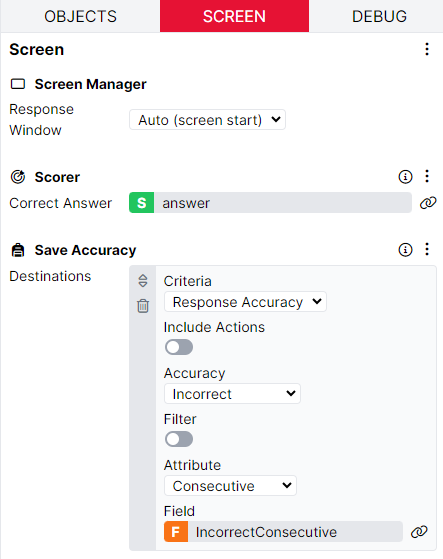
This task is very similar to the setup described above. However, in this example, we want the task to end if a participant gives 2 incorrect responses in a row. To do this, we have a Scorer component to record the accuracy of the responses. Then, we have a Save Accuracy component set up to save the Consecutive Incorrect responses to a field in the Store called 'IncorrectConsecutive'.
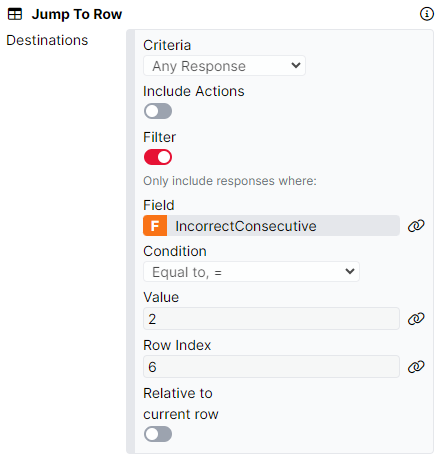
Then, on Screen 2 with the fixation cross, we can check the value in the IncorrectConsecutive field in the Store. In this example, we do this via the Jump to Row component. This is because we would like to direct participants to the end display of the task, to inform them that the task is over. To do this, we set the criteria to Any Response (this includes the 'continue' response that will be triggered by the Fixation component). We add a Filter and check whether the value in the IncorrectConsecutive field is equal to 2. If so, the participant will be jumped to row 6 in the spreadsheet, which is the end display. If this criteria is not met, participants continue with the rest of the task.
To have a closer look at the task setup described below, see our Exit Condition - Incorrect Trials in Consecutive Blocks Task.
In this example, we want the task to automatically end if the participant gives 1 or more incorrect responses in 2 consecutive blocks of trials. The task setup is the same simple odd/even number identification as above. On the trial screen, the Scorer component records the response accuracy, and the Save Accuracy component stores the number of incorrect responses to a field called 'IncorrectCount'.
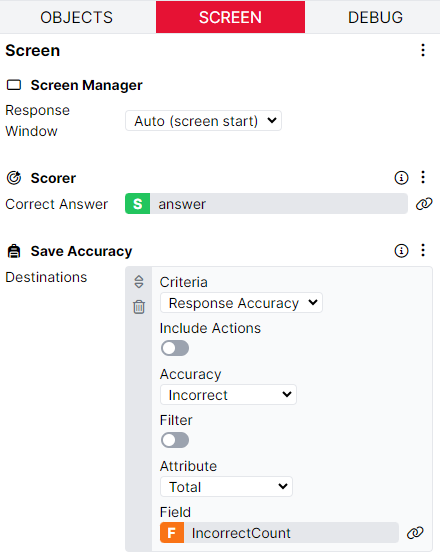
After each block of trials in the task, we present the 'check' display. This display has a single blank screen with a short time limit. On this screen, we use the Save Data component to evaluate the number of incorrect responses given in the previous block. If the Value in the IncorrectCount field is greater than or equal to 1, then we add 1 to the field 'BlockCheck'. This field will be used to keep track of whether incorrect responses have been given in consecutive blocks. If the Value in the IncorrectCount field is less than 1, then we know that all trials were responded to correctly, and we set the value in the BlockCheck field to 0. Finally, on Any Response (this includes the 'timed out' response that will be triggered by the Time Limit component), we set the IncorrectCount to the value of 0, ready for the next block of trials.
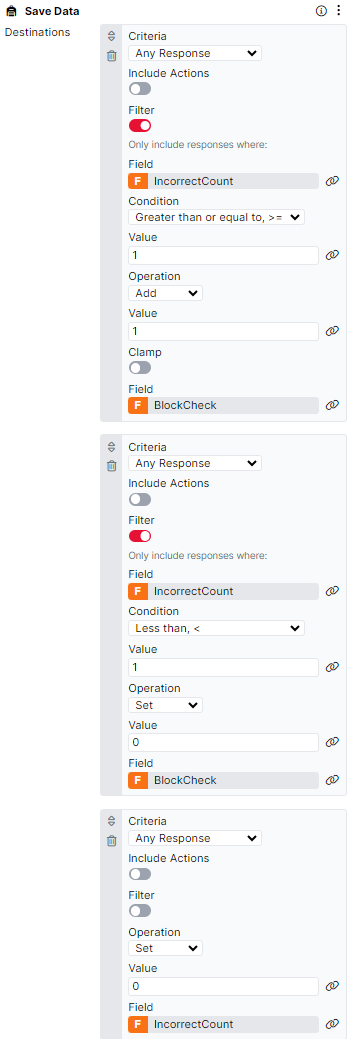
Finally, we use the Task Early Exit component to control when the task should end. Here, we have set this up so that when the Value in the BlockCheck field is equal to 2, the participant should be exited from the task.

Have a look at the Increasing Difficulty Task for an example of how to set up the functionality described below.
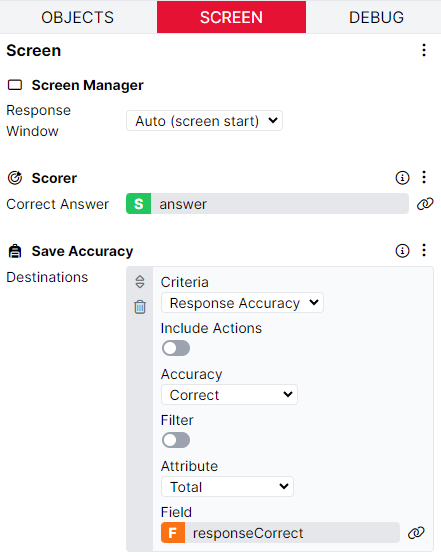
In this task, we ask participants to answer maths questions. We would like the questions to get more difficult as the participant gives correct answers. To implement this, we use the Change Difficulty (Spreadsheet) component. On Screen 1, participants give their response to the maths question via the Single Number Entry component. We evaluate the accuracy of the response given using the Scorer component and the number of correct responses given is saved to a field in the Store called 'responseCorrect' using the Save Accuracy component.
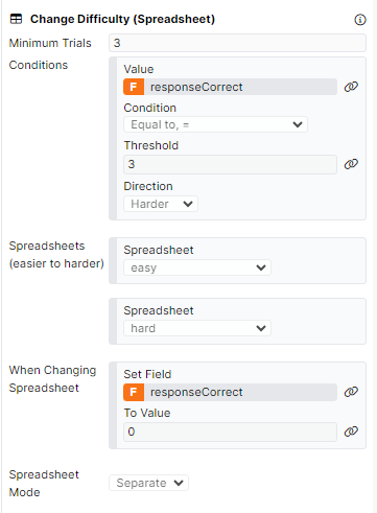
Screen 2 is a simple fixation screen where we evaluate whether the task difficulty should be increased. The Change Difficulty (Spreadsheet) component is configured so that participants must complete a minimum of 3 trials before the Change Difficulty logic is executed. The Condition for changing the difficulty is that, if the value in the responseCorrect field is equal to 3, the task difficulty should become harder. We must also define the order of spreadsheets from easiest to hardest, so that the difficulty can be adjusted correctly. When the difficulty is changed, and participants start a new spreadsheet, we make sure that the responseCorrect field in the Store is set to 0 so that the response accuracy can be calculated from the beginning.
This task setup can be easily expanded so that the task also gets easier when incorrect responses are received. To do this, the number of incorrect responses will also need to be saved to a field in the Store, and a second Condition should be added to the Change Difficulty (Spreadsheet) component.
For this section, please refer to the Learning with Dropout Task which showcases how to repeat trials until a correct response has been given for every one.
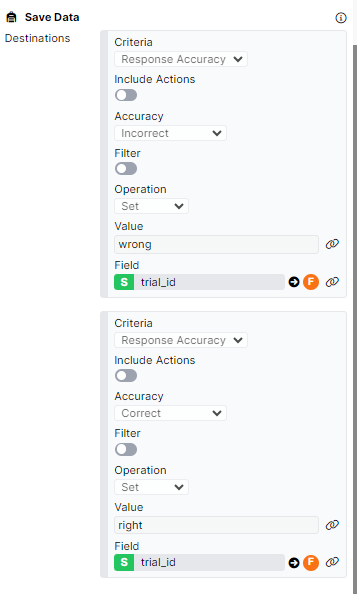
In this task, participants are asked to learn the colour pairings. After the learning phase, participants are asked to complete a simple recall on the Recall (all trials) display. Here, we test participants on their learning of each of the colour pairings. The accuracy of the responses are recorded via the Scorer component. We also need a method to record which trials have been answered incorrectly, and therefore need repeating. To do this, we use the Save Data component and its Advanced binding settings. When the response accuracy is incorrect, we want to set the value for this trial to ‘wrong’ and when the response accuracy is correct, we want to set the value for this trial to ‘right’. To make sure the response accuracy for each trial is saved to the Store separately, we ask Gorilla to look in the spreadsheet column ‘trial_id’ and then write to a field in the Store with that name. When you open the binding modal, it should look like the image below, with the Advanced Settings toggled on:

Then, once the binding has been configured, the component configuration settings should look like the example below:
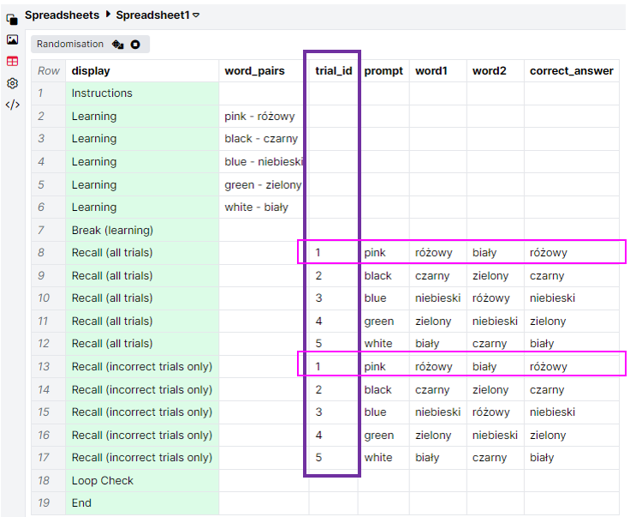
In the trial_id spreadsheet column, we have given each trial a unique entry. With this advanced binding setup in the Save Data component, it means that we can save the correct/incorrect value to unique fields in the Store for each trial. For example, for the pink-różowy colour pairing, if a participant gives an incorrect response Gorilla will look in the trial_id column and find '1'. This is then used as the name of the field in the Store which we set to 'wrong' via the Save Data component.
Once each trial has been shown once, we have a second recall display called ‘Recall (incorrect trials only)’, where only the trials which were previously answered incorrectly will be repeated. To set this up, all trials are listed again in the spreadsheet. Importantly, each colour pairing has the same trial_id in both the Recall (all trials) and Recall (incorrect trials only) displays.
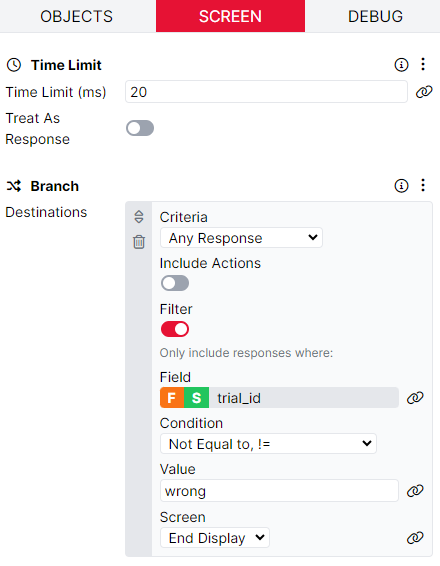
The display structure is exactly the same in the 'Recall (incorrect trials only)' display, except for the addition of a screen before the fixation. On this screen, we evaluate whether the rest of the trial should be shown, depending on whether this trial has been previously responded to correctly or incorrectly. To do this, we use the Branch component. We set the criteria to Any Response (this includes the 'timed out' response that will be triggered by the Time Limit component). We add a Filter and specify the Field we want to check. Again, we use the Advanced Binding settings to ask Gorilla to use the Value in the trial_id column of the spreadsheet, and find a field in the Store with that name. This is why it is important that each Recall (incorrect trials only) trial has the same trial_id value as the original Recall (all trials) trial, to ensure the correct field in the Store is associated with the recall. If the value in this field in the Store is not equal to the value 'wrong', then the display ends. Otherwise, participants continue to the next screen in the display.
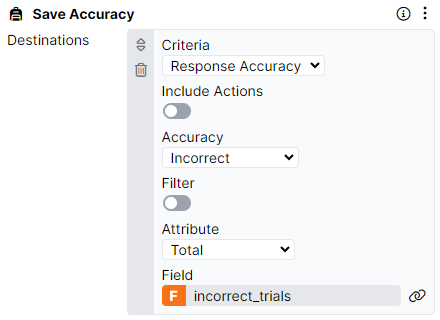
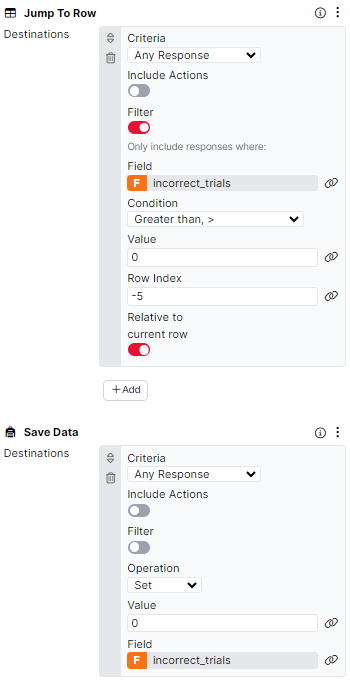
On the response screen for this display, we have the same setup as previously using the Save Data component, so the response accuracy can be saved to the Store via the trial_id column of the spreadsheet. There is also a Save Accuracy component which saves the number of incorrect trials given on these trials. We save the number of incorrect trials to a field called incorrect_trials.
Once all the trials have either been presented or skipped, we need to check if any trials should be repeated again. You can see this in action on the Loop Check display. Here, we have a blank screen with a very short time limit. The Jump to Row component is used to jump participants back 5 rows if the Value in the incorrect_trials field is greater than 0. Importantly, we use the Save Data component on this screen to set the Value in the incorrect_trials field back to 0, so the accuracy can be evaluated correctly if the trials are repeated again.
Once the incorrect_trials field is 0 throughout all of the Recall (incorrect trials only) trials, participants will continue to the End display and the task will finish.
To see the functionality described below in action, refer to the Running Total Task.
In this task, we want to show participants a running total of five Single Number Entry components. The aim of this task is to enter a number in each of the boxes to reach a sum total of 100. Participants can change the value they have entered in any box and click 'Save' to update the total.
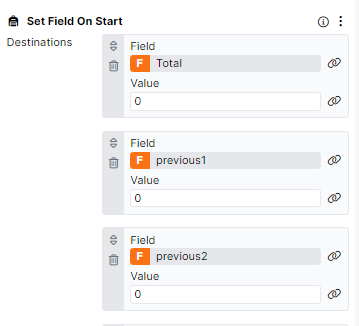
Each time the participant changes a value, we need to 1) subtract the amount previously entered in this box from the running total and 2) add the amount currently entered in this box to the running total. To do this, we need to set up two fields in the Store for each box: a 'current' field and a 'previous' field. At the start of the task, the 'previous' field needs to be 0 for each number entry box. We set this up, and also set the initial value of the running total to 0, using the Set Field on Start component.
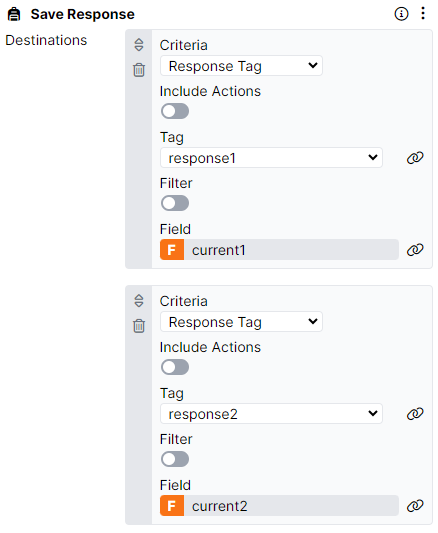
To add the individual numbers to the running total, we have given each number entry component a unique Response Tag e.g. response1, response2 and so on. When a response is received, we use the Save Response component to save the response to a unique field in the Store.
Then, we use the Save Data component to handle the calculation of the running total. Each time a response is received via a number entry component, we carry out three actions. To understand this, let's look at at the Number Entry component ‘Number 1’ with the Response Tag ‘response1’ first. When we receive the 'response1' tag, this is saved to the 'current1' field in the Store via the Save Response component. Then, we add this value to the Total field in the Store via the Save Data component. When this tag is received, we also Subtract the Value in the ‘previous1’ field in the Store from the Total field. The first time a response is submitted from this component, we will subtract 0 as we have set the field to 0 on screen start. This will change when additional responses are received. Finally, we save the value in ‘current1’ to the field ‘previous1’. This way, when participants alter the number entered in the number entry field, the total will update accordingly by subtracting the previous response from the total.
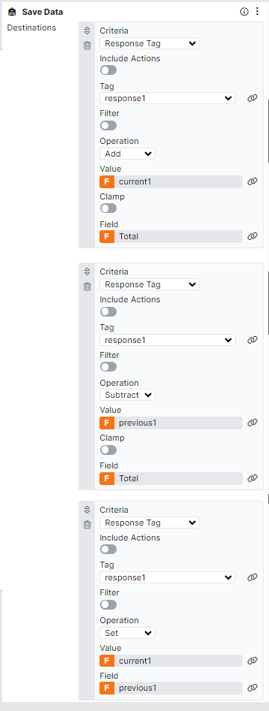
We implement the same setup for each of the response tags of the Number Entry component, so the Save Data component has 15 criteria in total (3 for each response).
Finally, we display the running total on the screen within a Markdown Text component using the syntax ${store:Total}.

Take a look at the Show Previous Responses Task to see the functionality described below in action.
In this task, we ask participants to rate a series of images. We want to save those ratings and present these to participants later in the task.
On the trial display, participants are asked to use the Slider component to rate their predicted productivity in the pictured office spaces. We want to save the response given here to the Store so that we can retrieve and redisplay this response in a later trial. To do this, we use the Save Response component and its Advanced Binding settings. When you open the binding modal, it should look like the image below, with the Advanced Settings toggled on:
Then, once the binding has been configured, the component configuration settings should look like the example below:

For each trial, a different image is used as defined by the ‘image’ column. Using the Save Response component, we tell Gorilla to look at this column and save the response to a field in the Store with the name of the current value in this column. This way, each response will be saved to a different field in the Store, named after the filename of the image used in the trial.
Once participants have rated each image once, we have a display that gives participants a fact about productivity in the workplace. Then, we want to show participants the same images again, the ratings they previously gave the image, and the opportunity to re-rate the image. To do this, we have a new display called ‘repeat_trial’ where we use the image column to recall the same 4 image files.
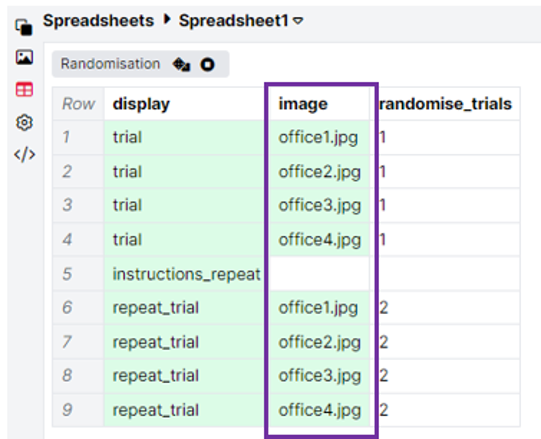
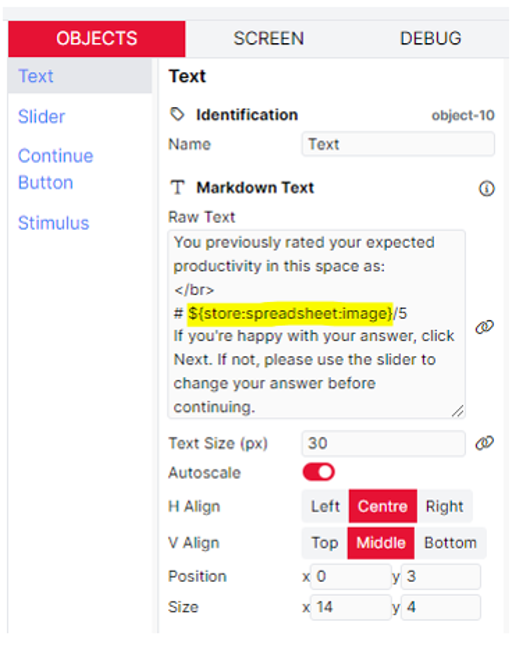
To show participants their previous response to the same image, we use the syntax ${store:spreadsheet:image} to retrieve the score previously given. This syntax will retrieve the value in the Store, which is named after the entry in the spreadsheet column ‘image’.
Have a look at the Stable Random Assignment Task to see how to set up the functionality described below.
The stimuli in this task are four face images and four names. We want to pair the face images with names randomly for each participant, but have these randomly assigned pairings remain stable during the task, so that the same face shows up with the same name consistently.
We perform the random assignment on the first row of the spreadsheet. We have a column named after each of our four image stimuli. (These column names must match the image filenames exactly, including extensions.) In each of these columns, we enter one of our four names.

We then use a Randomise Between Columns component applied to the four image columns to randomise the assignment of names to images.

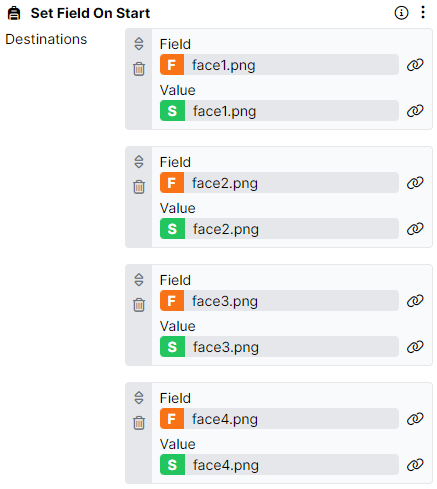
Within the task, we store these randomly assigned pairings on the 'prep' display. This is the display used in the first row of the spreadsheet, and so it will run at the beginning of the task. The display consists of a blank screen with a short timelimit: the real action happens on the Screen tab. Here, we use the Set Field on Start component to save our image-name assignments to the Store. We do this by creating a field named after each image stimulus. Again, the name of this field must match the image filename exactly:
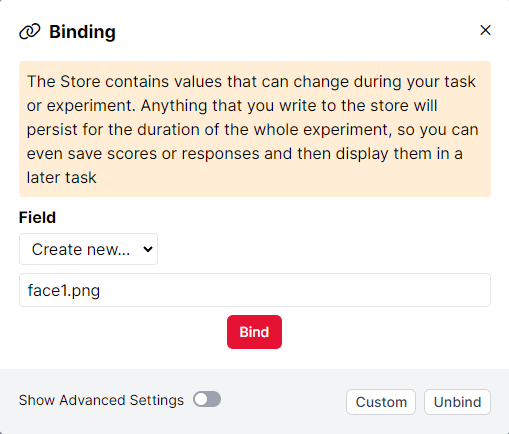
We bind the Value of each field to the correspondingly named column in the spreadsheet. So the field 'face1.png' will contain the name found in the 'face1.png' column after the contents of these columns have been randomised.
Finally, on Screen 2 of the 'trial' display, we bind the Image and Markdown Text objects to the face image and name for each trial. The Image is bound directly to the 'image' column in the spreadsheet, as normal. For the Markdown Text object, we toggle on 'Show Advanced Settings' and use an advanced binding. We look in the 'image' column in the spreadsheet, and then retrieve the value of a field in the Store named after the contents of that column.
This will retrieve the name stored for the current image.
Once each image-name pairing has been saved on the 'prep' display, it will not change. This means that we can retrieve the correct names across multiple blocks within a task, and even across multiple tasks within the same experiment! Simply use the same field names again in a later task in the experiment tree, and the correct names for each image will be retrieved.
To see the setup described below in action, take a look at our Store and Redisplay multiple responses task.
In this example, we present participants with an image and they are instructed to write up to 10 words that they associate with this image. Once participants have finished writing the words, they will be presented with each of the words a second time, and are asked to rate the relatedness of these words on a Rating Scale.
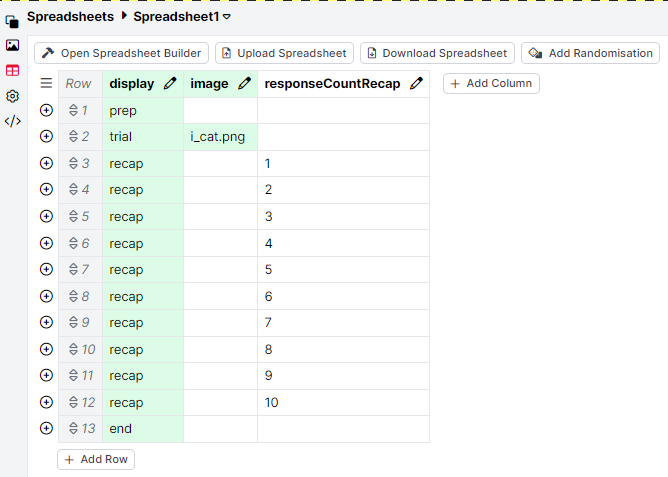
To understand how this setup is achieved, let's first have a look at the spreadsheet.
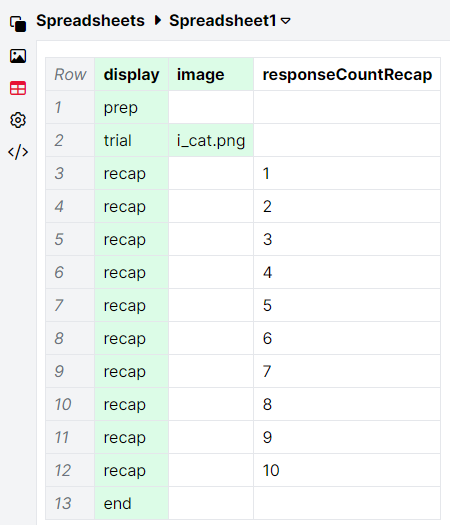
The first display presented to participants is a 'prep' display. Then, participants will be shown the 'trial' display where they will provide up to 10 word responses. Following this, we have listed 10 instances of the 'recap' display where participants will be shown the words they have previously submitted.
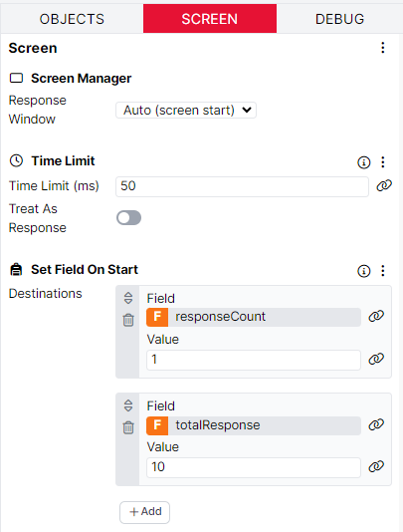
Now we understand how participants will flow through the task, we can have a look at how each of the displays have been built. The 'prep' display contains a single, blank screen with a short Time Limit of 50ms. A Set Field on Start component has also been added to prepare some of the fields in the Store we will be using in the next display. On this screen, we set the responseCount field in the Store to 1 and the totalResponse field to 10. More on how these fields function on the next display.
On Screen 1 of the trial display, participants provide up to 10 words via the Single Text Entry component. This component has been given the Response Tag 'response'. Using the Save Data component, each time this tag is received, we add the value of 1 to the responseCount field in the Store. Within the prep display, we previously set the value in this field to be 1, so after the first response is received from participants the value in this field will increase to 2. After the second response is received the value will be 3, and so on.
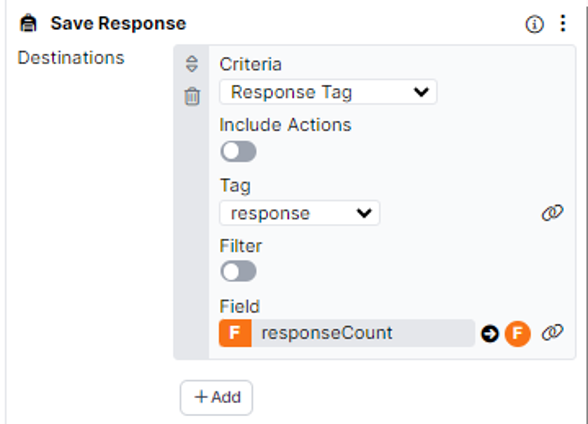
It is important that the responseCount field changes after each response is received so that each word submitted by participants can be saved to a different field in the store, allowing us to redisplay these later in the task. We store these responses via the Save Response component, using the Advanced Binding settings. This component is configured so that each time the Tag 'response' is received, we look in the responseCount field in the Store, and save the response to a field in the Store with that name. This means that when the first response is received, we store the response in a field called 1; when the second response is received we store the response in a field called 2, and so on. This is all handled by the Save Data component adding 1 to the responseCount field each time a response is received.
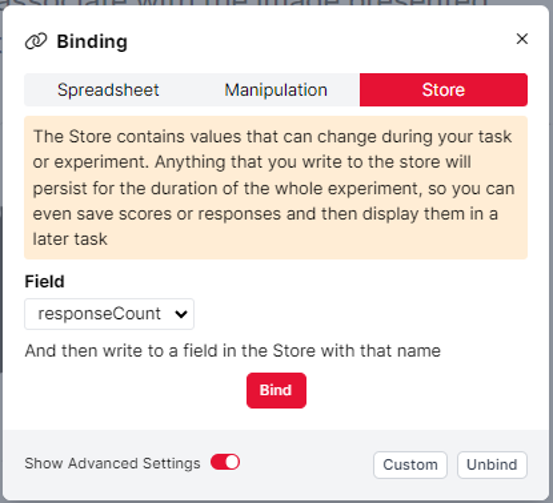
Once the binding has been configured, the component configuration settings should look like this:
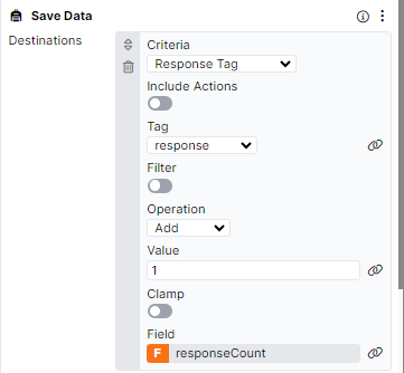
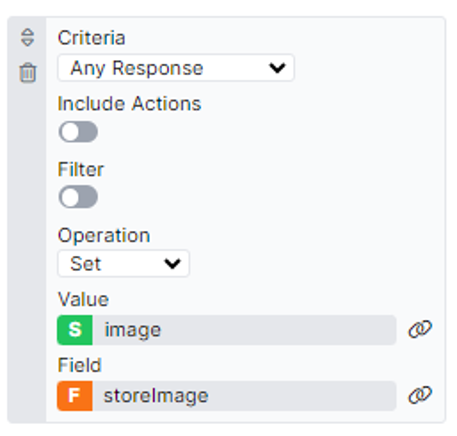
There are two further criteria configured in the Save Data component on this screen. We also save the image presented on the screen so we can redisplay this later in the task. The Image component is bound to the spreadsheet column 'image'. In the Save Data component, we save this by selecting Any Response from the dropdown, and setting the value in the image column of the spreadsheet to a field in the Store called 'storeImage'.
The final criteria of the Save Data component is setup to subtract 1 from the totalResponse field of the Store each time the tag 'response' is received. In the prep display, we previously set the value to 10. We use this value to show participants how many responses they have left, by binding the Text component to the totalResponse field. When the screen starts, this will show the number 10 and each time a response is received, the value will decrease by 1.
The final component on this screen is Advance - Continue. This prevents the default behaviour of the screen automatically advancing after the first response is received. Instead, the screen will only advance when the Continue Button is clicked, and allows multiple responses to be received on a single screen.
On Screen 2 of the trial display, we have another blank screen with a short Time Limit of 50ms. We also have the Save Data component, which subtracts 1 from the responseCount field in the Store. This has been added because the Save Response logic on Screen 1 will always run before the Save Data logic. This means that because the +1 to the responseCount always runs after we've added in the most recent response, it will always be one larger than it should be. This subtraction logic is important for recalling the correct number of responses later in the task and makes data analysis easier.
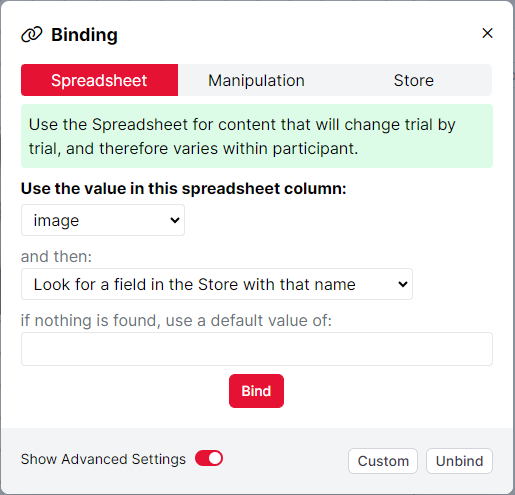
After the trial display is complete, participants move onto the recap display. Here, we redisplay the image used in the previous trial by binding the image component to the storeImage field. We also redisplay the words submitted by participants by using the Advanced Binding settings of a Text component. Here, we tell Gorilla to look at the responseCountRecap column of the spreadsheet and then look for a field in the Store with that name:
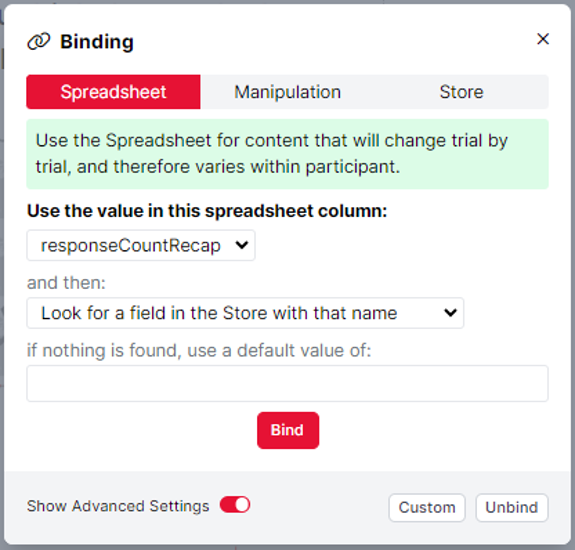
In the spreadsheet, each recap display has been given an entry from 1 to 10 in the responseCountRecap column of the spreadsheet, representing the number of responses that could have been submitted by participants. These match the names of the fields where we saved the responses to in the trial display, so Gorilla can now retrieve each of these responses separately.
Once participants have rated the word on the screen, the Continue Button will advance the screen. On Screen 2 of the recap display, we use the Jump to Row component to evaluate whether participants should be shown the next word, or if all of the words submitted by participants have already been shown and the task should end. To do this, we set the Criteria to Any Response and use the Filter toggle to run the evaluation. If the value in the responseCount field is equal to the value in the responseCountRecap column of the spreadsheet, the Jump to Row logic should run. If this criteria is met, participants will be jumped to row 13 of the spreadsheet, where the task will end. If this criteria is not met, the task will continue.

To explain this logic a bit further, if participants only gave 3 responses on the trial display, the value in the responseCount field will be 3. By running this Jump to Row logic, participants will see the first 3 recap displays. After this, the Jump to Row component criteria will be met, as the value in the responseCount field in the Store (3) will be equal to the value in the responseCountRecap column of the spreadsheet (3). This means that participants will only see the recap trials that redisplay a word submitted by them, rather than lots of empty displays where they did not submit enough words.