Please Note: These documents refer to Task Builder 2, and are a work in progress.
You can find the corresponding information for Task Builder 1 in this Step by Step Guide to the Stroop Task.
Task Builder 2 is our new tool that builds upon the functionality that you might be used to from our original Task Builder 1, but with some great new changes! Even if you're used to Task Builder 1, this step-by-step walkthrough should get you up and running with some of the new features that we've implemented in Task Builder 2.
The best way to get started with the Task Builder 2 is to build a real task. This guide will walk you through the process of creating a Relational Reasoning task, complete with fixations, stimuli and response scoring.
If you're not sure what the Relational Reasoning task is, click here for a quick explanation.
Relational reasoning relates to the unique human capacity to see meaningful patterns in information.
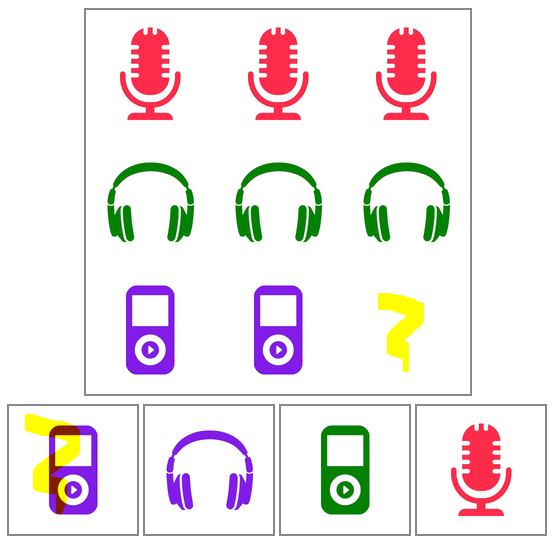
Take a look at the following puzzle of nine icons, where the bottom right icon is missing. Along the bottom are four possible icons that could go in the empty space. We can reason that the purple music player icon completes the puzzle as it fits the existing pattern.
We suggest you have two tabs open - one with this walkthrough, and one to create the task in. To start the walkthrough you should open your Gorilla homepage. You will also need the stimuli used in this task - you can download them here:
The finished task will look like this:
You can also view a finished version of this task in our Task Builder 2 Samples Project.
Please Note: These documents refer to Task Builder 2, and are a work in progress.
You can find the corresponding information for Task Builder 1 in this Step by Step Guide to the Stroop Task which explains How to Create a Project.
First, create a new project and then create a new task inside it by choosing 'Task Builder 2' from the dropdown list under the New Tools heading. Click 'Edit' to start building the task.
Please Note: These documents refer to Task Builder 2, and are a work in progress.
You can find the corresponding information for Task Builder 1 in this Step by Step Guide to the Stroop Task which explains How to Start Building.
The main sections of Gorilla tasks are called displays. Within each display, you can have multiple screens. You can think of a screen a little like a PowerPoint slide. You can choose a blank screen and start from scratch, or you can choose and edit one of our pre-made templates. All screens are fully customisable!
We'll start by creating the instructions screen. This will be an image of one of the puzzles, together with some text explaining to the participant what to do.
Go to the Displays tab and create a new Display called 'Instructions'. We'll want to use an image for our instructions screen so go to the Stimuli tab using the left-hand navigation menu and upload the instructions image.
Navigate back to the Displays tab and click on the first screen (we'll only need one screen for this display) to start building from scratch. Unlike the zones in Task Builder 1, we now create our screens using Objects and Components. You can think of Components as like Lego bricks - they are little blocks of functionality that you can combine together flexibly in an Object to create the behaviour you want. You can find a full list of components in our Task Builder 2 Components Guide.
Add a new Object. For this we only need one component in our object which is an Image. Once done, set the image to be the instructions image that you uploaded. You will see the image appear in the preview area. Adjust the size to make it bigger.
Unlike Task Builder 1, you can now see a live preview of your screen as you create and edit your task!
Please Note: These documents refer to Task Builder 2, and are a work in progress.
You can find the corresponding information for Task Builder 1 in this Step by Step Guide to the Stroop Task which explains How to Add Instructions.
We'll now flesh out the instructions screen. Add a new object and this time choose a Text component. Move it down below the instructions image and adjust the size either by changing the Position and Size settings, or by interacting with the live preview. Enter the instructions text and adjust the text size to make it bigger.
To allow the participant to advance from this screen we need to add a Continue button. Add a new object, and choose a Continue Button.
Note that in the menu the Continue Button is labelled a 'Prefab'. Prefabs are template objects that are made up of multiple components, and represent some likely objects that users might need for building behavioural tasks.
This will advance the screen when clicked. Move it down below the text, and our instructions screen is complete!
Please Note: These documents refer to Task Builder 2, and are a work in progress.
You can find the corresponding information for Task Builder 1 in this Step by Step Guide to the Stroop Task.
We can now go ahead and put together our trial screen. We want to display the puzzle image, which is a 3x3 grid of images with the bottom right one missing. We'll then display four possible options for this missing image along the bottom, and the participant has to choose the one they think fits into the missing space.
Let's start by adding the puzzle image. First, upload the rest of the images on the Stimuli tab. Next, create a new Display called Trial. Click on the first screen, and choose a Blank Screen. Add an object, and choose the Fixation prefab. Within this prefab, the Fixation Timing component controls the timing, whereas the Fixation Cross component controls the visual. The default timing and sizing settings here can be left as they are.
Next, go back to the Display tab, and add a second screen to the Trial display. On this screen, add a new Image object with an Image component, just like you did when creating the instructions.
However, we want the puzzle image to change with each trial. We're going to use a spreadsheet to describe our trials, and one of the columns in the spreadsheet will contain the name of the puzzle image for that trial. To tell Gorilla which column to use, we bind our image field to a specific column which will add that column to the spreadsheet.
To do this, click the little link icon to bring up the binding dialog. Choose Spreadsheet as the source, and then in the drop down select Create New, and call it Puzzle. In the Advanced Settings we can set a default of p1.png (this is the name of the first puzzle). Setting a default in this way allows you to configure the screen layout more easily, but when the task runs for real (or when we come to preview it properly) it will use the value you defined in your spreadsheet and change trial-by-trial!
Please Note: These documents refer to Task Builder 2, and are a work in progress.
You can find the corresponding information for Task Builder 1 in this Step by Step Guide to the Stroop Task which explains How to Add Responses.
We now want to create our response buttons. Similarly to the puzzle, we also want the four responses to be listed in our spreadsheet, so that we can ensure that the right puzzle and response images are kept together.
Add a new object with an image component, and bind it in the same way you did for the puzzle, this time calling the spreadsheet column Response1. This gives us another image that is controlled by the spreadsheet, but at the moment nothing will happen when we click on it.
To allow this object to collect responses, we can add a Response component to it. This is where the power of the object and component system really shines because we can start customising our object! From within the 'response1' object, click Add Component and choose Click Response. You can see in the dialog that the component is added to the object, but doesn't replace the image component that's already there. The Click Response component listens for clicks on the object it's attached to, and triggers a response for each one. You can attach a Click Response component to any object that displays something (text, image, video etc) to turn it into a response button.
Finally, we then bind the response field to the same spreadsheet column as the image. This means that whenever we click on our image, the response that we submit will match the name of the image we clicked on.
Please Note: These documents refer to Task Builder 2, and are a work in progress.
You can find the corresponding information for Task Builder 1 in this Step by Step Guide to the Stroop Task.
Now that we've created one response button, we can go ahead and create the other three. Firstly, we want to adjust the positioning of the first response so that it is displayed off to the left. Duplicate the object, and adjust the positions to arrange the response buttons in a row.
Similarly to the first image, we can bind the other three Image components to spreadsheet columns: Response2, Response3, and Response4 accordingly and optionally change the default image in each case. We can also bind the Click Response component's field to the same spreadsheet column as the image.
Please Note: These documents refer to Task Builder 2, and are a work in progress.
You can find the corresponding information for Task Builder 1 in this Step by Step Guide to the Stroop Task.
We've set up our response buttons to capture responses, but we also want to score them and check if the participant's response was correct or incorrect. We do this by adding a special Scorer component to the entire screen. Navigate to the Screen tab, click Add Component, and choose Scorer. You can then bind the Correct Answer setting to a new spreadsheet column called Answer.
Please Note: These documents refer to Task Builder 2, and are a work in progress.
You can find the corresponding information for Task Builder 1 in this Step by Step Guide to the Stroop Task.
To finish off our task, we want to add a simple finish screen. Go back to the Displays, add a new Display called Finish, and create a single screen containing some text and a continue button. You can use the Continue Button prefab which already comprises two components: Button and Click To Continue. Type in some text and customise the button label to say 'Finish'.
Please Note: These documents refer to Task Builder 2, and are a work in progress.
You can find the corresponding information for Task Builder 1 in this Step by Step Guide to the Stroop Task which explains How to Drive the Task with a Spreadsheet.
Now that we've set up our displays, we can tie them all together using a spreadsheet. The spreadsheet is a powerful driver for our task to create dynamic trial-by-trial content. It allows us to define the order our displays should come in, and populate the columns that we created when binding our Image, Click Response, and Scorer components to the spreadsheet. Go to the Spreadsheets tab, and click New Spreadsheet. You could use the Launch Spreadsheet Builder option, but for the purposes of this demo we'll start with an Empty Spreadsheet and populate it manually by clicking Create. You can see that the columns that we set up in our bindings earlier are all displayed here: Puzzle, Response1, Response2, Response3, Response4, and Answer.
We want to start with our instructions, so click Add Row and then in the Display column, enter Instructions.
Next we want participants to see a Trial, so add a second row, and put Trial in the display column. Add the correct image names for the puzzle and responses. You'll notice that cells go green when you enter a valid display or stimulus name - this helps you spot any typos (see the mistake when entering Response4!).
When you've added a single trial, click Preview to preview your task. You should see the instructions followed by a single trial.
Please Note: These documents refer to Task Builder 2, and are a work in progress.
You can find the corresponding information for Task Builder 1 in this Step by Step Guide to the Stroop Task.
Now that we've got a single trial working, we can upload the full spreadsheet.
Please Note: These documents refer to Task Builder 2, and are a work in progress.
You can find the corresponding information for Task Builder 1 in this Step by Step Guide to the Stroop Task which explains How to Preview your Task.
We can now preview our task to check that it's working. Previewing can now be done in one of two ways!
Preview and Debug: If you head back to Screen 2 of our Trial display and click on Debug, you can instantly preview how the screen will look based on any row on the spreadsheet; it will either display the images that we set up in the spreadsheet with binding, or the default images that we set up earlier in Step 4 (this is what happens when we try to debug row 1 and row 9 which are the Instructions and Finish displays). You can also press the Play button above the Screen Preview and try clicking on the correct answer. It will show you which image was clicked and therefore which response it recorded, as well as whether or not it was correct based on our Scoring component! This is a powerful new way to check that your stimuli and responses are working as you intended.
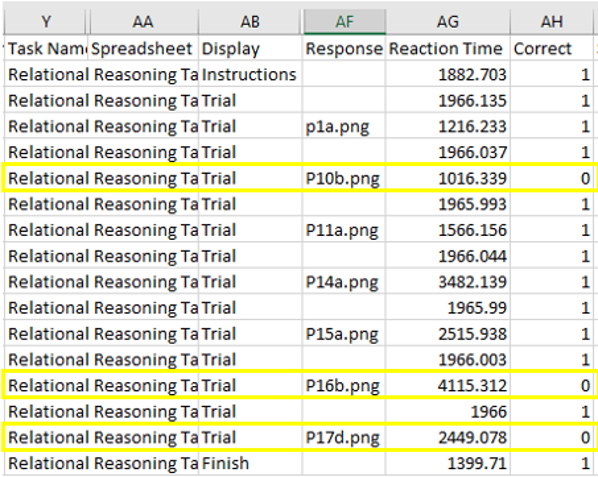
Preview task flow: Just like in Task Builder 1, you can also run through the whole task by clicking Preview at the top right. If you watch the video below, you'll see that two of the final three trials were answered incorrectly. If you do the same and download your data, you'll see that this is reflected in the Correct column (see screenshot below the video).
That's everything you need to get a basic Relational Reasoning task all set up and ready to add to an Experiment tree! You can add your task to an experiment by following our step-by-step guide to the Experiment Builder.
There are many ways you can build on these steps to add more features to your Relational Reasoning task, such as adding between-participants conditions by using Manipulations, or using the Store to save participants' accuracy scores and display them at the end of the task. For a more detailed explanation of these and other Task Builder 2 features, take a look at our How To Guide.