When building tasks, many configuration settings can be set directly. Whether it's the text of an instructions screen or the time limit for a screen, you can simply set the value you want in the tools:
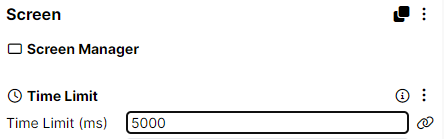
In the case above, the screen will always have a time limit of five seconds. But this isn't always what we want - we might want different trials to have different time limits. Or we might want to have two experimental conditions with different time limits. Or we might have a task where the time limit changes dynamically depending on the participant's performance. We know we want a time limit, but we want to specify it somewhere else.
Instead of entering a value directly, we can instead dynamically link this field to another source of data - for example, a column in the spreadsheet, or an experimental manipulation. In Gorilla, we call this binding - we bind the field to a data source that allows it to be defined elsewhere. You can bind any configuration setting that has the little link icon ( ).
Sometimes, you may need to store specific values in separate fields in the Store for later retrieval during a task. To achieve this, you'll need to use the Advanced Binding capabilities. The Advanced Bindings enable you to create a 'daisy-chain' of binding where the name of the field is specified in either the spreadsheet or in another field in the Store.
While a simple binding suffices for most tasks - such as storing a count of correct answers across trials - there are situations where the Advanced Bindings are necessary. For example, if you want to store individual responses separately in the Store, so each one can be retrieved later in the task, you will need an Advanced Spreadsheet Binding. Similarly, if you need to capture and store multiple responses on a single screen for later retrieval, you will need an Advanced Store Binding. Many tasks outlined in the From Simple Components to Advanced Functionality guide showcase these Advanced Binding configurations.
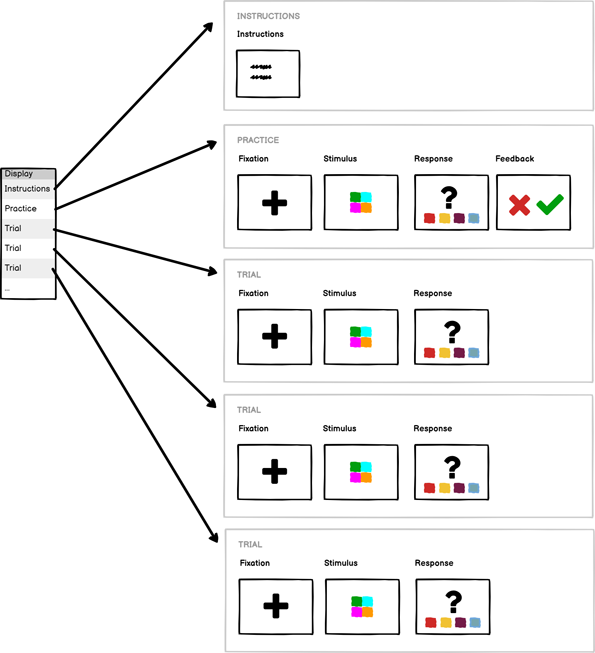
The most common use case for binding is using the spreadsheet. In both Task Builder 2 and Game Builder, the spreadsheet defines which displays or scenes the participant will see, and in what order - it effectively defines the protocol for the task. For each row in your spreadsheet, the task will perform the display or scene defined for that row:
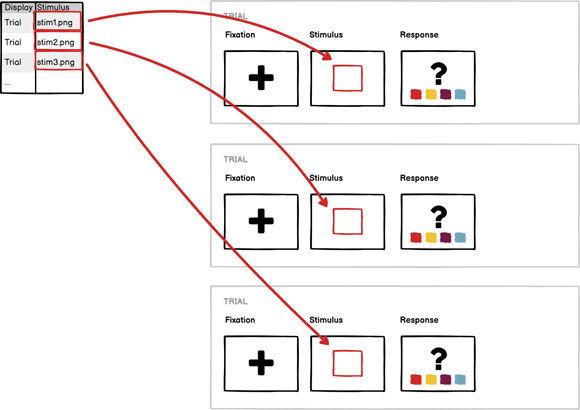
A lot of the time, you'll want to have lots of trials, but have the stimulus be different for each one. You achieve this by binding your stimulus field to the spreadsheet, so that on each trial, it takes its value from a particular spreadsheet column:
To do this, click the binding icon next to the setting you want to bind, and either choose an existing spreadsheet column or create a new one:
You can now upload your stimuli and add them to your spreadsheet. If you go back to your trial and open the Debug tab, you can select a spreadsheet row to preview so that you can check that your bindings are working:
Check out our How To Guides for more information on using the spreadsheet in Task Builder 2 and using the spreadsheet in Game Builder.
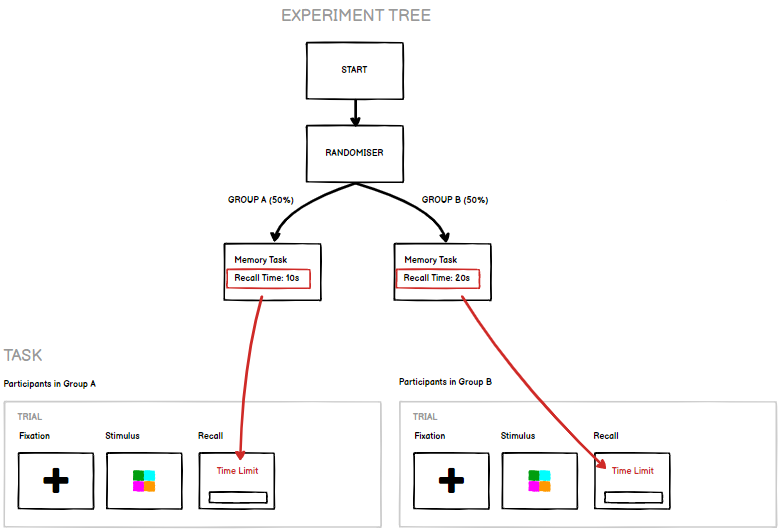
Manipulations are settings that you can control at the experimental level. Rather than have settings that change trial-by-trial, this allows you to have settings which you can configure differently for different experimental conditions. To give a simple example for a memory task, you might want to have all your participants do the same task, but have half of them do the task with a longer recall time and half with a shorter recall time:
To do this, click the binding icon next to the setting you want to bind, and either choose an existing manipulation or create a new one. When you preview your task, you can now set the value for that manipulation to help you test it:
When you add your task to an experiment, you can now configure manipulations separately for each instance of the task:
Each participant has their own unique Store - data that belongs to them and stays with them for the duration of the experiment. You can think of it as a little backpack or suitcase that each participant carries with them, and you can put values in there and then retrieve them again later. In the first generation of tools, this was referred to as Embedded Data - we've changed the name to Store because we think it's a better term, but it fulfils the same function.
The simplest use-case for the Store is when you want to save a participant's response and then use it later in the task. Note that this is separate from recording responses for your actual experimental data that you download once your participants have finished - participant responses are always recorded in your downloaded data; the Store is purely when you also want to be able to use a particular response later in the task.
For example, imagine a memory task where the participant is asked to specify an animal at the start of the task, and then recall it at the end. We want to check if the participant's recalled response at the end of the task matches their initial response at the start - i.e., whether they recall their response accurately. You would save their initial response to the Store at the start, perform the rest of the task, ask them to enter the animal again at the end, and compare their response to the one from the Store to establish whether they were correct:
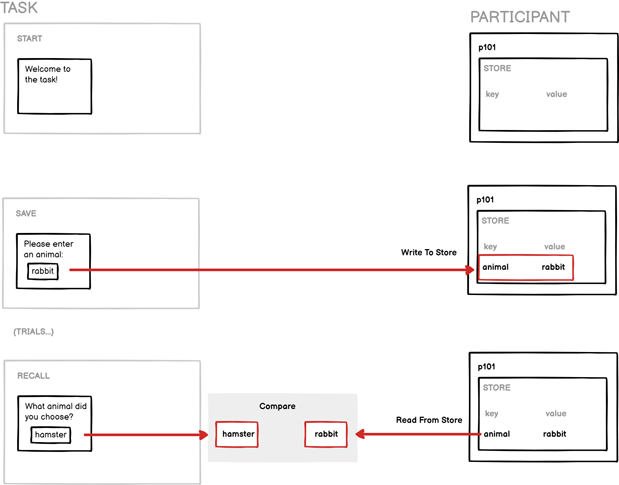
To do this, you first need to tag your response, and then use the Save Response screen component to save the response to the Store. On the recall screen, you can now bind the Correct Answer field of your Scorer component to the same field in the Store:
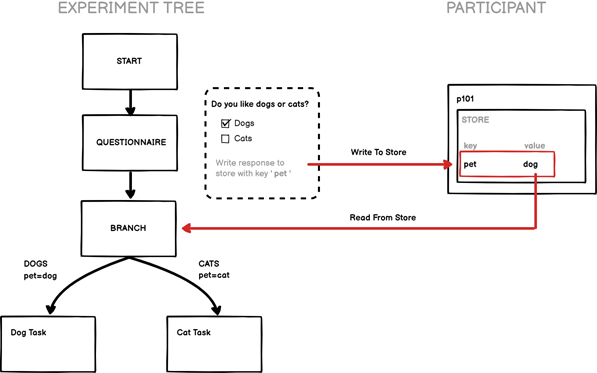
Data in the Store is global by default, and so any values that your task writes to the Store will also be available in future tasks, as well as in the experiment tree. The most common use-case of this is to record a response in a task, and then use that response to branch the participant in the experiment tree.
For example, imagine an experiment which first asks participants whether they prefer dogs or cats as a pet, and then directs them to a different task depending on their response - so dog people get one task and cat people get another. In Gorilla, we start with a questionnaire which asks the initial dog or cat question, and we then save this to the Store under the key pet. By the end of the questionnaire, all participants should have one value called pet in their Store, which will either be cat or dog. The next node is a branch node, which looks up the value of pet in the participant's Store, and directs them down the appropriate branch:
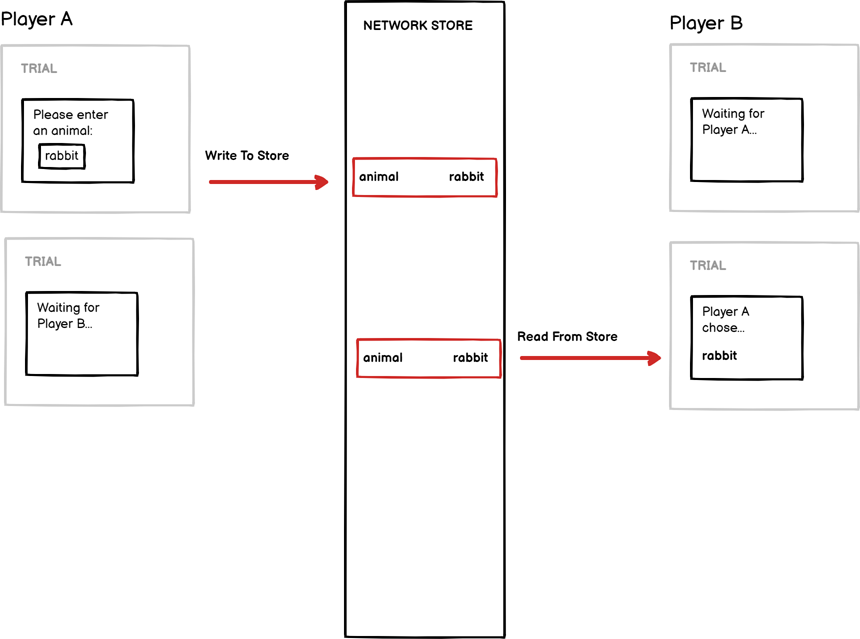
The Network Store is only used in Multiplayer tasks. It is similar to the Store, except that instead of each player having their own unique Store, the Network Store is a single store that is shared and synchronised between all players. If Player A writes a value to the Network Store, then it will also be updated for Player B.
This is useful for sharing state between players. For example, if you wanted to capture a response from Player A and display it to Player B, you would have Player A write the response to the Network Store, and then bind the text display for Player B to the same field:
For more about multiplayer, read the overview guide for an introduction, and then go through our step-by-step guide to build a multiplayer task for yourself.
Advanced spreadsheet bindings allow you to bind components to specific fields in the Store, as defined by the spreadsheet. This setup is useful when you need to store individual responses from each trial in separate fields in the Store. This way, you can later display all responses given across trials.
In a similar way to how we bind content to the spreadsheet to change the stimulus presented on a trial-by-trial basis, in this setup we just change the name of the field in the Store on a trial-by-trial basis. This way, we can ensure each response is saved to a unique field in the Store, so we can easily retrieve each response individually later in the task.
For example, say we have 4 trials in our task and we want to save each response given by participants to the Store so we can give participants a recap of all the responses given throughout the task. We can achieve this by using a Save Response component and utilising its advanced binding settings. To access these settings, toggle the 'Show Advanced Settings' option in the binding window.
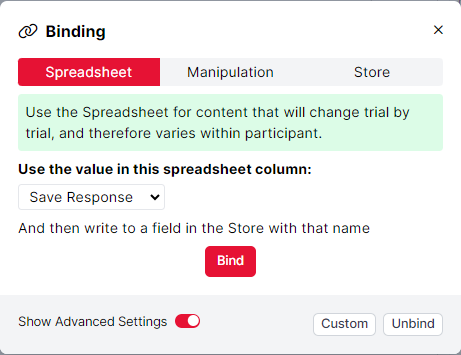
In the example above, we ask Gorilla to look in the spreadsheet column called 'Save Response' and then save the response to the field in the Store defined in this column. In this spreadsheet, we need to list unique values to be the names of the fields in the Store. The response will be saved to the Store under this field name:
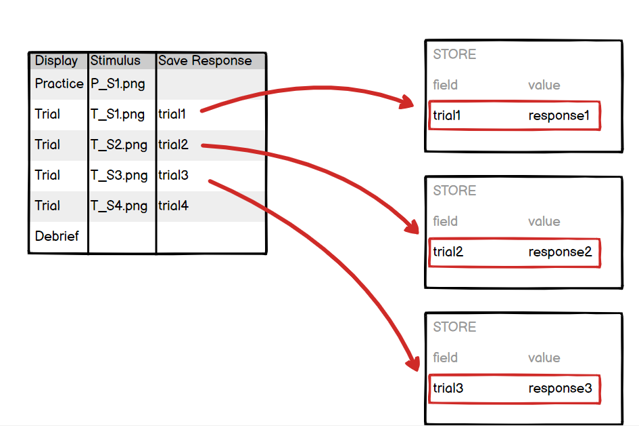
For this example, the response in the first trial is saved to the Store in a field called 'trial1', the response from the second trial is saved to the Store in a field called 'trial2' and so on. This means that we can easily retrieve each of these responses with a simple binding to the Store and the associated response from this trial will be shown.
We have a helpful Response Recap Tutorial which uses this advanced binding setup - this is a great example to see the functionality in action!
Advanced Store bindings allow you to bind components to specific fields in the Store, defined by the value in another field in the Store. The most common use case for this example is if you would like to collect multiple responses on a single screen, and redisplay these responses to participants later in the task.
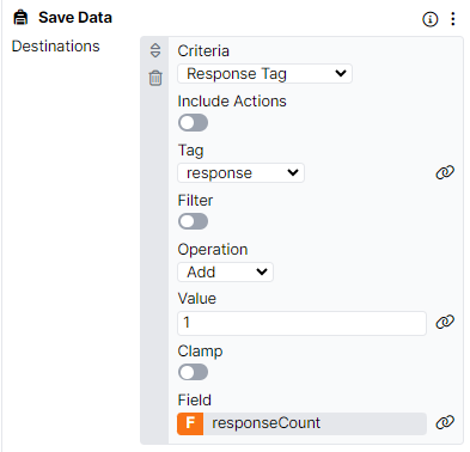
In order to save each response separately, we need to configure some other components so we can ensure that each response is saved to a unique field in the Store. The easiest way to do this is via the Save Data component. Using this component, we can create a field in the Store called 'responseCount' and each time a response is received on the screen, a value of 1 is added to this field. This means that when the first response is received, there will be a value of 1 in the responseCount field; when the second response is received, the value in the responseCount field will be 2.
Now that we have configured a way to change the value in the responseCount field, we can use this to save each response given by participants on this screen to a unique field in the Store. We achieve this by using the Save Response component and its Advanced Binding settings. To access these settings, toggle the 'Show Advanced Settings' option in the binding window.
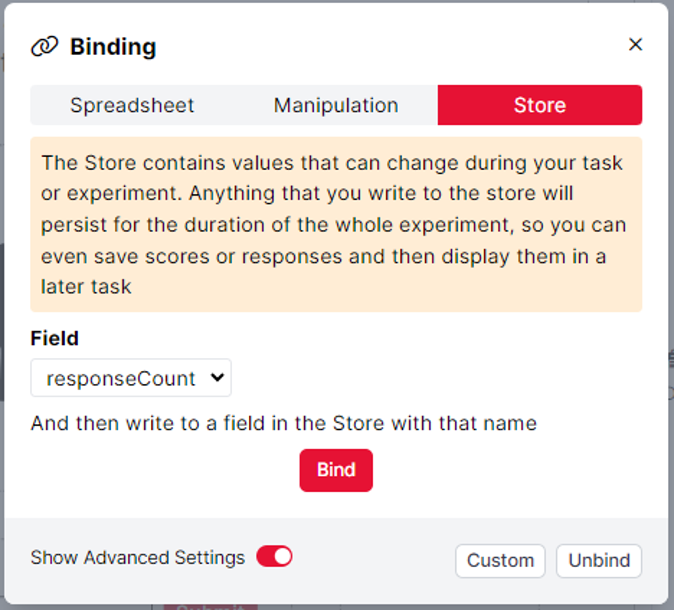
With the binding above, Gorilla will save the response to the Store, and the name of the field where the response is saved will be the value in the responseCount field at that time. For example, when the first response is received the value in the responseCount field will be 1, so the response is saved to the Store under the field name 1. When the second response is received, the value in the responseCount field will be 2, so the response will be saved to the Store under the field name 2, and so forth. With the logic configured via the Save Data component, the value in the responseCount field will always change when a response is received, allowing for every response to be saved to a unique field in the Store.
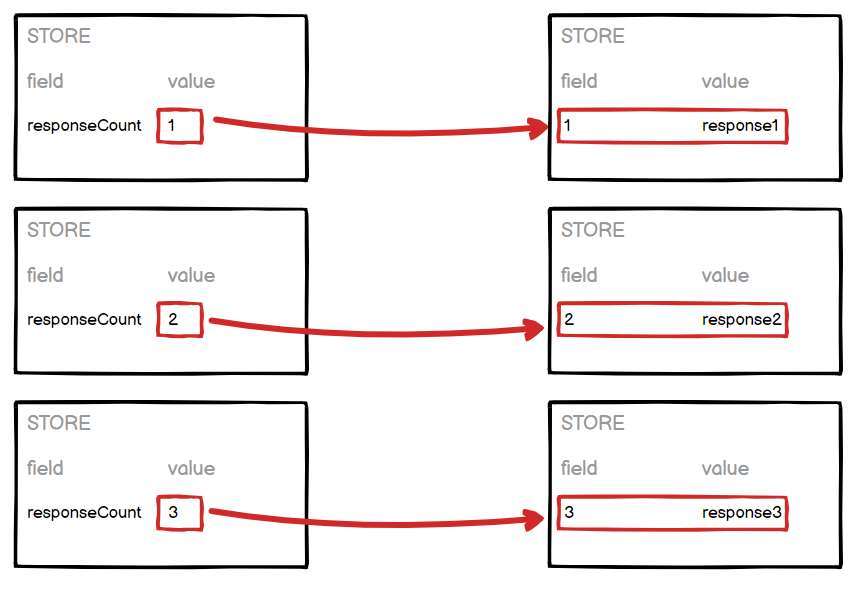
Then, when we want to retrieve the responses saved to the Store in this way, we will need to use a simple Store binding to retrieve the responses saved under the fields 1, 2, 3 and so on.
We have a helpful example of Storing and redisplaying multiple responses from a single screen in our From Simple Components to Advanced Functionality guide. This is a great way to see this set up in action.